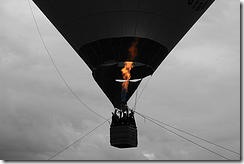
One of the techniques people most often ask me to teach them is making a photograph like the one on the right that is black and white with one other colour. There are a few ways to achieve this effect but here is the one I find easiest for Photoshop users:
1) Open a suitable photograph, this can be any subject but ideally it needs an area of bright colour that will have an impact when it’s finished while the rest of the photo looks good in black and white. For example:

2) Select IMAGE>ADJUSTMENTS>DESATURATE to turn the photo black and white. But don’t take the photo out of RGB (i.e. don’t convert to black and white or mono) or the next step won’t work.
3) Select the history brush from the tool menu on the left of the screen (usually the fifth icon down in the right hand column), set hardness to 100% and choose a suitable brush size to work with on the section of the photo you want to put in colour.
4) Now use the brush and go over the area you want in colour, the brush will erase the black and white and bring back the colour. You may need to zoom and work close up on some sections. Take your time and change brush sizes if you need to.
It’s that simple! Here are a few more examples to give you inspiration:


0 komentar:
Posting Komentar