This tutorial will show you how you can create that cool 3D pop-out effect using simple steps in Photoshop. Here’s the before and after photos;
Let’s get started!
Step 1. ) Open the image (file > open or ctrl+o)
Step 2. ) Copy your background image (ctrl+j) and you’ll have ‘layer 1′ above your background layer
Step 3. ) Now make a new layer above the ‘original’ and another one below it. Name your new layers: frame and shadow. Your layer pallete should look like this;
Step 4. ) Click on your ‘frame’ layer, then create a rectangular using marquee tool, and go to edit > Stroke, change the color to white and the width to 10 pixel, OK. Now go to Edit>transform>Distort and modify your frame until it looks like this;
Step 5. )Click on ’shadow’ layer and fill your ’shadow’ layer with black. Then click on your background layer and fill the layer with white.
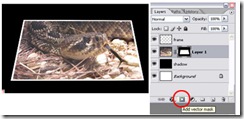
Step 6. ) Click on your ‘frame’ layer. Choose magic wand, and select the inside part of your frame. Now click on your ‘layer1′ and click on ‘add layer mask’ button as below;
Step 7. )Choose a brush tool, and pick ‘white’ as your foreground color and starts paint the layer mask to reveal the snake body.
Step 8. )Click on the ‘frame’ layer, click on the ‘add layer mask’ button and using brush tool starts painting your white border with black to hide it.
Step 9. )Now erase your ’shadow’ layer using Eraser tool
That’s about it.. and here’s again our before and after photos


![clip_image009[1] clip_image009[1]](https://blogger.googleusercontent.com/img/b/R29vZ2xl/AVvXsEhc8TWLIL3Wl0RokZ6NCMcU8zPvrj1vTvrF1UqL53CXd3PC8iEGX8UoTzJdgmLCB_CbArDVInnM5MavHYM4vr2c9xM-xviHbQQDjG-wWdlvYJ1mGc7_uFRYmKXG1nhzmypkEsDgeqvmugUJ/?imgmax=800)
0 komentar:
Posting Komentar